Tag Archives: Card making

Star Card Valentine!

I really do spend way too much time watching crafting YouTube videos, and not enough time actually making crafty things. This weekend I decided to change the paradigm. Well, maybe not exactly. I saw an excellent video from Treasure Books on making a Christmas star card. It was beautiful! I thought I could use some of my junk journaling supplies and do a Valentine’s Day star card, so I did.

The front cover is layered paper with a felt heart I cut out of a little jewelry bag. I used seam binding for the closure and added a pink polka dot binder clip to use when it is opened up.

For the first section, I used a wildflower field guide page, a faux ticket and a letter pressed tag that says love. I added a thesaurus page with the word love and a glitter heart. The next section was made with scrapbook paper and a bunch of heart cut from scraps. I’ve had those hearts forever (and I still have a million more). The third page includes “The Song of the Red Clover Fairy” from the Flower Fairy collection. Section four is more scrapbook paper, a project life card and a small gold envelope with a matching card. The fifth page is red graph paper with a wooden heart and a handmade pocket. I added a magnetic heart page marker. The final page is various washi tapes and heart stickers.

This was a super fun project as I got to be creative with all the odds and ends I had in my craft room.

Star Card Valentine Cover
Page 1
Page 2
Page 3
Page 4
Page 5

Page 6

Long Forgotten Items

A million years ago, I bought a box of blank cards and envelopes by My Mind’s Eye, the Union Square set. Beautiful, thick, glossy cards patterned with creams, dark orange, and grey. And there they sat for years. They moved with me to the Pacific Northwest and moved back to the desert Southwest. I think they may have been a bit sad being tucked away in the craft room closet. But today was their day!

I recently purchased the Spring Critters stamp and die set from Close to My Heart and thought the images and sentiments would be perfect for a quick card for my work colleagues. Since I was crafting on my lunch break, I wanted to make the cards simple, but I wanted them to be cute too.

Hello there, Mr. Fox!

I punched a 2.25 inch circle out of olive green card stock from LCI Paper and glued it on to the card front. Used the fox stamp with the “hello there” sentiment and a bit of water color pencils to make the image pop a little. I mounted the image on foam squares to add a bit of depth.

Quick, easy and cute!

In Sympathy

One of my colleagues had a death in the family this week, and my heart goes out to her. I wanted to let her know I was thinking of her, so I put together this simple sympathy card.

Simple Sympathy Card

I used a lilac base and layered white card stock on purple. To add a little texture I tore the edges. I used the calla lily stamp from Stampin’ Up’s retired Long Stemmed set. There are two lilies on the white piece, with a third lily that I fussy cut and put in place using foam dots. I used water color pencils to add a little color and finished it off with a bit of cream satin ribbon.

I hope this card can brighten my friend’s day a little.

Snow Day – Stash Day

Today was a snow day, so in between work emails, I went upstairs and played with my stash. I have a huge stash of stuff. Card stock, patterned paper, and more. I am sure I have told you about my obsession with die cuts, Stampin’ Up, and Project Life cards. I love them all. I buy new and used Stampin’ Up, much to my husband’s consternation. I must have a couple of hundred stamp sets. Many of which I haven’t used yet.

So thinking about how to best use what I have, I got an idea. I could use my Project Life cards on the front greeting card. A while back I ordered a grab bag of envelopes from LCI paper (a great deal of 1000 assorted envelopes, for $40, you don’t know what you’ll get so it’s a surprise). Unfortunately, they sent a grab bag of card stock instead. When I called to let them know of the issue, they told me to keep the paper and sent me the envelopes. Yay for good customer service. So I found some A1 sized pieces in a moss green and looked through my gazillion Project Life cards and found a few I though would coordinate and got started. I used a Sizzix label die cut, pulled out a few random Stampin’ Up stamps and got to town:

I am pretty sure when my mini dachshund barks, she is saying “I hate the mailman!”

I used watercolor pencils for the car. I loved the little puff of smoke with this stamp set. It reminded me of my first car.

These little love birds are precious!

Now I need to find a few stamps and send them off to family and friends. Happy Tuesday to all!

Button Maker, Baby!

So my husband knows I have a new button maker.  He works from home, so he got the package when it came.  The good news is that I cleaned up my craft room before the button maker was delivered, so he wasn’t too mad.

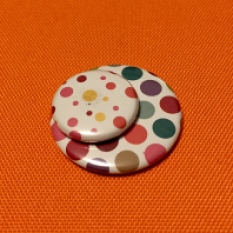
Buttons are really quite easy to make. Pick a pretty paper, or stamp something, or use a picture, whatever you want.  Punch out the appropriate sized circle.  The circle must be bigger than the finished size of the button.  I have punches that coordinate with the button makers, so no guessing for me.  The button is made of four pieces.  The shell, which is the backing for the top of the button, a back, the pretty paper and a mylar cover. I like to make magnets, not pin backed buttons, so I have a fifth piece, a magnet set between the shell and the backing.

The Tecre button makers have two wells and a press:

Button Makers

This picture shows both my 1 inch and my 1.5 inch button makers.  You can see one of the wells, and the other well is hidden under the press.  In one well you layer a shell, then the pretty paper on top and the mylar on top of that.  Once you have the shell and paper set, you press it in the machine.  In the second well, you place the back.  If you are making a magnet, you put the magnet on top of the back.  The start of your button is in the machine, then you swivel around the backing, press again and out comes your button.   It is so easy to to and the results are fabulous!

Here is a quick YouTube video I found that shows how these button makers work:

Now I am going to go play with my new toys. Let me know if you would like me to make you any button magnets!

The Russians are Coming

I am very excited because I signed up for a Russian class this term.  I haven’t had a Russian class in years.  It is a conversation class, so it should be tons of fun.  The best part is that it is a community education class, so no grades.

I recently made some cards with Soviet stamps.  I purchased these used postage stamps on a whim from a seller on Etsy (I really love Etsy, so much cool stuff), and when I was going through my new treasures I found several stamps with Russian icebreakers.  They are beautiful stamps.  So I glued them on some card stock, to make them a bit more rigid, and then added them to a blank card.  Easy peasy.  They turned out pretty good.

Teal Stamp 2

Do you think I should give one to my teacher?  Since there are no grades, that wouldn’t be brown nosing, would it? Ha!

I am so Attracted to Magnets

A while ago I bought a button maker.  I love it!  What I really like making are magnets.  Find a cute paper, punch it out, put the parts in the machine and, bam, you have a cool magnet.  I love my button maker so much, I just bought a second one.  I have a one inch button maker and I am soon to have a one and a half inch button maker.  I can’t wait to get it.  Let me know if you need some cool magnets 🙂

Please don’t tell my husband that I will soon have another button maker.  I told him I would clean up my craft room last year.  Now I know that last year was really only a couple of weeks ago, but I am pretty sure I told him I would clean up my room last, last year; and it is still not clean.  This is a problem, because I kind of said I would clean my room before I bought the bigger button maker.  Well, I do have Monday off in honor of Dr. Martin Luther King, Jr.  So guess what I will be doing on Monday :-).

Here is my latest card.  I used the button maker to make a cute flower magnet.  Then I attached it to a card.  So when I send the card, it is also a little gift.  Pretty cool, right!

Magnet Card

Back on the Wagon!

Happy 2016 to everyone!  I started my year with a quick trip to Arizona to visit with my family and to host a baby shower for my niece.  It was a lovely party (and the food was great; thanks to my sister!).  What a great way to start a year.

One of the things I am looking forward to this year is getting back into my crafts and keeping up with my blog.  So, for the first week in January, I thought I would share a card-in-the-box I made the last week in December.  bike in a box 3

I really like stamp sets that have corresponding die cuts.  This set has the cute step through bike stamped in orange and a road bike stamped in dark purple.  I used a really awesome, double sided card stock – one side with bicycles and the other side is a pretty green pattern.  I added the stars and arrows just for fun.

I have another cute card I made with button magnets that I will share soon.

May the new year bring you and your family health and happiness!

Reboot Day Three

This weekend I met up with my friend and we did a bit of crafting.  I brought my Sizzix Bigshot and a few dies and a bunch of Stampin’ Up! Halloween stamps.  I used my new favorite die, the step up card and went to town.  I stamped out this totally awesome witch.  Tonight, I pulled out my Copic markers and added a bit of green to that witch.  She looks good, doesn’t she!

Halloween Witch!
Halloween Witch!

I don’t like the stamps on the bottom too much, so for the next one, I think I’ll skip them.

Day Two of the Reboot

This is day two of a full week of crafts.  I have been neglectful of the peace and joy that crafts bring, so I am making a concentrated effort to do at least one crafty thing every day this week.  So you will have to forgive the bad lighting on my pictures, because if I wait until the sun comes out, I won’t keep going.

I was at Craft Warehouse a couple of weeks ago and both the cutest stamp set with corresponding dies from Lawn Fawn.  What is sweeter than a gumball machine?  Last weekend I bought a new Sizzix A2 sized step up card.  And then I had the idea for this card.

Cute gumboil card!
Cute gumball card!

I thought you might like to see my new storage solution for my Accucut dies.  These awesome cubbies are from Ikea.

One cubbies filled with Accucut dies.

I recently got a label maker so I could easily tell which die is which.  If you need any invitations or party favors, I’m your gal!